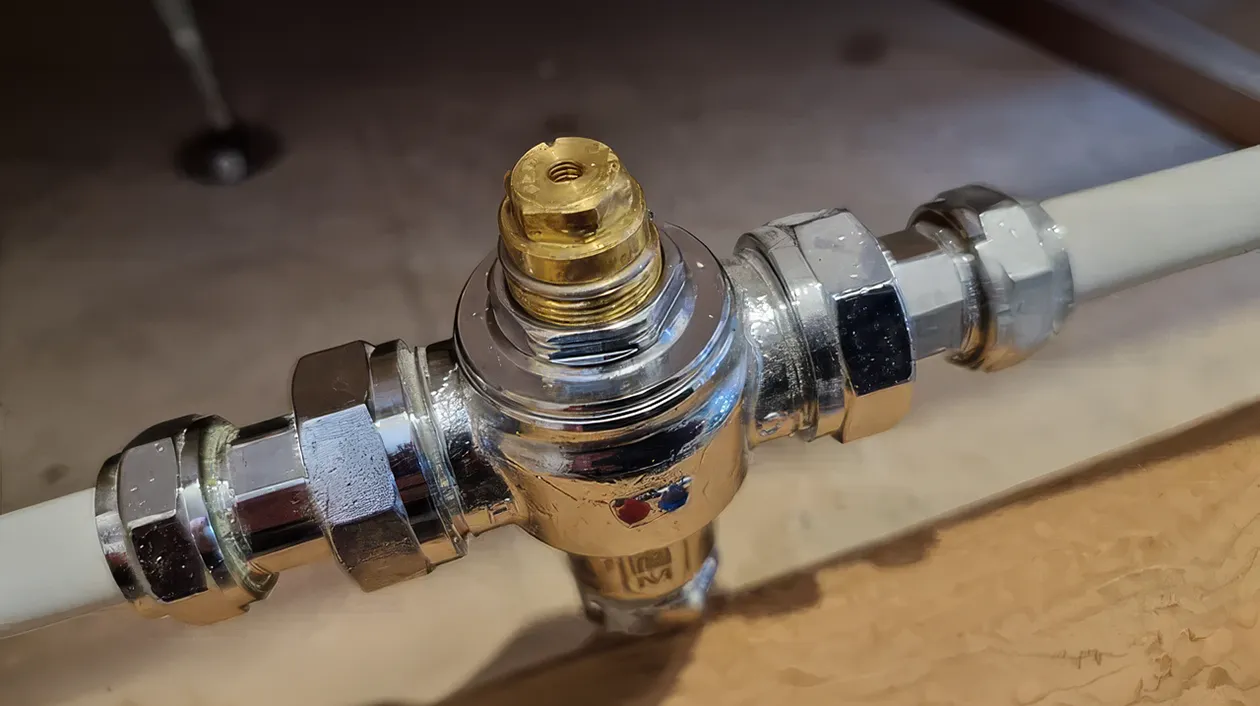
Thermostatic mixing valves work by mixing hot and cold water at a balanced or stabilised temperature. These are the valves that will help guarantee that you have the right temperature for your hot water without having to set it manually. In other words, you don’t have to be afraid of dealing with lukewarm water first and then scalding water after one twist of the valve.
What Does This Mean for Your Daily Routine?
A thermostatic mixing valve (sometimes called a tempering valve) is that clever bit of plumbing magic responsible for ensuring your shower, tap, or even a large boiler always delivers water at just the temperature you expect, no more, no less. By automatically blending the right amount of hot and cold water, these valves act as tiny but tireless temperature regulators hidden in your system.
But these valves aren’t just about convenience. They are working behind the scenes to boost your comfort, save energy, and keep your household running smoothly. By continuously adjusting the mix of hot and cold water in response to temperature changes, thermostatic mixing valves ensure that your home’s water temperature stays stable all day, every day. This means you’re not only spared the shock of sudden icy or scalding bursts, but you also end up using energy more efficiently, which can help lower your bills over time.
Why Does This Matter for Your Comfort and Budget?
Stable water temperature makes daily routines like showers, hand-washing, and dishwashing more pleasant and predictable. Plus, a well-regulated system can improve the efficiency of your heating or cooling setup, ensuring that hot water reaches your taps faster and with less waste. The result? A more comfortable, energy-smart household and a boost to your everyday quality of life.
The Energy-Saving Edge
Thermostatic mixing valves aren’t just about comfort; they are also unsung heroes when it comes to energy efficiency. Here’s how they quietly contribute to a greener, more cost-effective home:
- Reduced Heat Loss: By allowing water heaters to store water at higher temperatures and mixing it down to a safe level only when needed, TMVs minimise heat loss through long pipe runs and storage tanks. Less wasted heat means less wasted energy.
- Optimised Water Heater Performance: TMVs help your water heater operate within its most efficient range. No more yo-yoing temperatures or unnecessary reheating, giving you just steady, reliable performance that keeps your energy bills in check.
- Prevention of Overheating: By stopping water from being heated beyond what’s necessary, TMVs cut back on wasted energy and help your plumbing system last longer by reducing thermal stress.
So, with a thermostatic mixing valve at work, you get the best of all worlds: consistent comfort, protection for your pipes, and a welcome break for your pocketbook as your home runs a little smarter every day.
Meet the Thermostatic Valve Head: The Unsung Hero
So, what exactly is the thermostatic valve head, and what does it bring to the table? Picture this as the “brain” of your mixing valve setup: smart, dependable, and surprisingly intuitive. The head is the component you turn to set your desired water temperature, acting like your personal thermostat. Some advanced models even sneak in sensors to read ambient conditions, keeping things extra precise.
Inside that seemingly simple plastic knob is often a liquid sensor. Think of it as an internal temperature detective. This sensor reacts to water temperature changes in real time, adjusting the mix of hot and cold faster than you can say “not too hot, not too cold.” When attaching the valve head, make sure it’s lining up perfectly with the connection points; a firm clockwise twist will secure it in place. And here’s a tip: always install it atop the valve body itself and not directly onto your pipework.
Feel unsure about fitting it? No shame in bringing in a professional plumber to make sure everything is snug, safe, and set for years of flawless performance.
Why Does It Matter?
Maintaining a stable water temperature isn’t just about comfort (though that’s a big plus). It’s also about safety. Thermostatic mixing valves are particularly important in homes with children, the elderly, or anyone who might be vulnerable to sudden temperature changes. With a TMV in place, you drastically reduce the risk of accidental scalding, so you can step into the shower with confidence every time.
You’ll find these valves at work in all sorts of settings, from your bathroom basin to commercial kitchens and large-scale water heaters, quietly making sure the water that flows is always just right for the task at hand.
Like Goldilocks, you can say “This one is just right” if you have thermostatic mixing valves installed. You’ll know that a thermostatic valve is efficient when it regulates both hot and cold water inlet and operates under pressure variations. This gives you automatic hot and cold water distribution depending on the level shown on the handle.
Why Adjusting Your Thermostatic Mixing Valve Matters
Fine-tuning your thermostatic mixing valve isn’t just about nitpicking. There are real, practical benefits that touch both safety and comfort at home. Setting the temperature correctly means you’re much less likely to experience an unexpected blast of hot or cold water (no more scalding or icy surprises mid-shower). Think of it as finding that “just right” temperature, Goldilocks-style, every single time.
From a safety perspective, having your TMV adjusted ensures your hot water never gets hot enough to pose a scalding risk, making it a must-have for families with kids or elderly relatives. On the other hand, consistently maintaining a safe minimum temperature also helps ward off the risk of Legionella bacteria, which thrive in tepid water.
And let’s not forget energy efficiency. By keeping your TMV set to the optimal temperature, your water heater doesn’t have to work overtime, so you’ll notice a difference in your energy bills without compromising on that perfect shower experience.
How Do You Adjust a Thermostatic Mixing Valve?
Adjusting a thermostatic mixing valve is surprisingly straightforward. Most valves feature a numbered dial (typically ranging from 1 to 5) that you can turn to set your preferred temperature. Each setting corresponds to a temperature band, often between 0°C and 28°C (though some models might stretch from -10°C up to 30°C). For most households, a setting around 15°C is considered the minimum safe temperature, but you can tweak this based on your comfort level, health needs, or the quirks of your plumbing system.
If you want even finer control, many TMVs allow you to set the minimum flow using a screw at the base of the valve. This adjustment helps the valve respond more quickly to temperature changes, meaning there’s less lag time when someone flushes a toilet or starts the dishwasher, for example.
Quick Steps to Adjust a TMV:
- Turn the adjustment dial on the valve’s sensor to your desired setting (usually levels 1 to 5).
- Test the water temperature at the outlet and fine-tune as needed.
- If available, use the screw at the bottom to set the minimum flow for faster response.
Whether you’re looking for steamy baths or a safe splash for the kids, dialling in your thermostatic mixing valve lets you lock in the comfort and safety you want without the guesswork.
How Can You Make Sure Your TMV Is on Target?
Consistency is key. So how do you know your thermostatic mixing valve is delivering water at the right temperature, time after time? The answer is simple: a quick check-up every now and then works wonders.
Grab an accurate thermometer (brands like ThermoPro or Taylor work just fine) and test the water right at the tap or showerhead. Run the water for a minute or so to let it settle, then hold the thermometer under the flow. If the temperature is spot on with your chosen setting, you’re good to go. Notice a few degrees’ difference? It might be time to tweak the dial or, if things feel truly out of balance, call in a professional for recalibration or a possible valve repair.
Just like you’d tune a guitar before a gig, making a habit of these regular spot-checks gives you reliable, Goldilocks-approved comfort every single day.
What Are the Different Types of Thermostatic Mixing Valves?
If you thought “thermostatic mixing valve” was a fancy term for just one gadget, think again. These clever valves come in several varieties, each with its own special job to do (just like the different chairs in Goldilocks’ cottage). Here’s a quick run-down so you can pick the right one for your castle, cottage, or commercial kingdom:
- Point-of-Use Valves: These sit right at the sink, shower, or bath. Think of them as your personal bodyguard against scalding and icy surprises, making sure every outlet delivers water “just right.”
- Group Valves: More social than their point-of-use cousins, group valves manage water temperature for several outlets at once. Perfect if you’ve got a lineup of showers or basins (looking at you, gym changerooms and hotel bathrooms).
- Central Mixing Valves: Want to keep things consistent throughout an entire building? These centralised options control the temperature for all the water flowing out from your hot water system, keeping every tap singing from the same hymn sheet.
- High-Flow Valves: For those situations where you need a river, not a stream. Think industrial dishwashers or commercial laundries, as these valves can handle large volumes of water without breaking a sweat.
- Solar-Specific Valves: If your hot water comes courtesy of the sun, you’ll want a solar TMV. These are designed to safely tame the sometimes-scorching temperatures your solar system can dish out.
- Low-Pressure Valves: Working with a gravity-fed system or battling pressure that’s a little lacklustre? Low-pressure TMVs are made for trickier situations, ensuring you don’t end up with wild temperature swings if someone flushes the loo down the hall.
- Healthcare Valves: In hospitals or care homes where water temperature is a matter of safety (not just comfort), there are specially designed TMVs. These offer extra-precise control and added anti-scald safeguards for when “just right” is absolutely essential.
Picking the Right TMV for Your Space
Now, before you start mixing and matching valves like you’re building a dream team, there’s one more thing to know: different environments have their own “house rules” for TMVs. For most commercial washrooms, a standard TMV (often called a TMV2) will keep you compliant and comfortable. But if you’re working in healthcare settings, such as hospitals, clinics, or care homes, there are stricter standards at play. In these settings, only high-spec healthcare TMVs (sometimes referred to as TMV3) make the grade, as they’re tested to deliver an extra layer of safety where it matters most.
Certifications and Standards Matter
It’s not just about picking a valve and hoping for the best. TMVs need to meet certain certifications and be built to relevant safety and quality standards. In many regions, local regulations require valves to be certified (like TMV2 or TMV3) to make sure they truly protect against scalding and meet performance expectations. So, before you commit, check if your chosen valve is stamped with the right approval for your job. Think of it as making sure your Goldilocks chair won’t collapse the moment you sit down.
It’s worth noting that these different types of valves are measured and certified according to their own standards, so you can’t really pit them against each other in a “which one’s best?” showdown. It’s not about one being better than the other. It’s about choosing the type that fits your needs and ticks all the regulatory boxes.
No matter which type you need, each TMV is designed with a specific environment in mind. That way, you get the perfect balance of comfort and safety, whether you’re running a home, business, or taking care of vulnerable folks.
What to Look For When Choosing Your TMV
Before you make your pick, it’s worth taking a closer look at a few key features. After all, even Goldilocks had to check the size of the chair before sitting down! Consider the following:
- Suitability for Your System: Make sure the valve you choose matches your plumbing setup. Think about your water pressure, source (solar, mains, etc.), and the number of outlets you need to serve. Remember, the goal is to pick a valve that not only fits your current setup but also keeps every tap and shower running safely and smoothly, no matter where the hot water is headed. TMVs can be installed in all sorts of places: showers, baths, sinks, and even bidets. They’re also versatile enough to work with most types of water systems, whether you’re on gravity-fed, pumped, unvented, or mains pressure.
- Temperature Range & Flow Rate: Check the degree range and flow settings. This ensures the valve can actually deliver that “just right” temperature, even during peak demand.
- Connection Type: Not all valves fit all pipes! Double-check that the valve head and connections are compatible with what you have at home.
- Warranty & Support: Like any good investment, you’ll want peace of mind. Look for products with a solid warranty and reliable after-sales support, just in case you ever need a helping hand.
- Customer Feedback: See what other homeowners or businesses have to say, as sometimes a quick scan of reviews reveals hidden gems (or deal-breakers).
- Ask for Expert Help: If you’re unsure, don’t hesitate to consult with staff at your local plumbing supply store or get advice from a licensed plumber. They’ll help you find the right fit, so you can enjoy safe, comfortable water every time.
What is a Point-of-Use Thermostatic Mixing Valve?
Point-of-use thermostatic mixing valves, as the name suggests, are installed right where you need precise temperature control. Think of the bathroom sink, your morning shower, or even the bathtub the kids like to treat as a swimming pool. Instead of controlling water temperature for the whole house, these little wonders focus on a single fixture. The result? Steady, comfortable water exactly where you want it, and peace of mind that there won’t be any nasty surprises when you turn on the tap.
What Are Low-Pressure TMVs, and When Should You Use Them?
Low-pressure thermostatic mixing valves, or TMVs, are designed to keep water temperatures steady even when your plumbing system isn’t running at full steam. If your home relies on a gravity-fed or only partially boosted water supply, such as in older houses or rural properties, these valves are your unsung heroes.
Rather than throwing a tantrum when water pressure takes a dip, low-pressure TMVs step in to maintain the “just right” temperature Goldilocks would approve of. They’re an excellent fit wherever water pressure rises and falls, like in houses with tanks up in the attic, or when you’re sharing a water heater with a couple of overzealous shower enthusiasts.
High-Flow TMVs: When Do You Need Them?
So, what exactly is a high-flow thermostatic mixing valve, and why might you ever need one? Think of high-flow TMVs as the industrial-strength cousins in the mixing valve family. They come into play when you need to deliver large amounts of perfectly tempered water quickly, which is something you’d typically see in commercial kitchens, busy restaurants, or even hospitals where dishing out dozens of gallons at a time is par for the course.
Imagine the lunch rush in a bustling café with the dishwasher humming nonstop, or a manufacturing plant relying on consistent water temperature for its processes. In these situations, a standard valve just can’t keep up. High-flow TMVs are built to handle these heavier demands, making sure that the water coming out is not just a trickle, but a steady, reliable flow, always at the safe, “just right” temperature.
What is a Group Thermostatic Mixing Valve (TMV) and Where is it Used?
If you’ve ever wondered how hotels manage to deliver perfectly tempered water to every shower and sink in a busy bathroom, look no further than the group TMV. A group thermostatic mixing valve is designed to regulate the water temperature for several outlets at once, like clusters of taps or showers all sharing one clever controller behind the scenes.
You’ll usually spot these hardworking devices in commercial locations like gyms, hospitals, schools, or hotels, where there’s a row of basins or showers that all require the same safe, steady water temperature. Instead of each tap having its own mini-valve, the group TMV keeps the whole team in sync, keeping everyone comfortable and lowering the risk of any chilly or scalding surprises.
Benefits of Using Thermostatic Mixing Valves
Here are the benefits of using a thermostatic mixing valve:
- These valves are intended to make your pipes and equipment more durable and long-lasting because of the minimal, if any, presence of solenoid valves, tap heads, and seats.
- They help you save energy by lowering energy costs as compared to having an ordinary valve.
- These valves help prevent thermal shock and injuries.
- Thermostatic mixing valves prevent the growth of harmful bacteria like Legionella in your water supply due to the controlled temperatures, which is above 55 degrees Celsius.
The only problem here is that any temperature higher than 43 degrees can cause scalding burns.
That’s where the beauty of thermostatic valve adjustment comes in. Most thermostatic mixing valves allow you to set the output temperature within a safe and comfortable range. Typically, this is anywhere from 0°C up to around 30°C, though the most common settings for domestic hot water hover safely between 38°C and 43°C. Most users will find 15°C at the lower end to be suitable for those who prefer cooler water or for special health requirements. Adjusting the degree is usually as simple as turning a dial or lever on the valve itself, making it easy to tailor your water temperature to personal preference or household needs.
This adjustability is especially helpful for families with young children, elderly members, or anyone with particular sensitivity to temperature changes. Whether you want a piping-hot shower or a gentle, tepid wash, setting the right degree on your thermostatic mixing valve keeps everyone comfortable and safe.
Newer valves have features like automatic preservation and reaction features, which efficiently manage your water temperature. If there is a change in pressure, the temperature in the mixing chamber also changes, and corrections and adjustments are made automatically.
How to Replace or Install a Thermostatic Mixing Valve
A lot of DIY enthusiasts would enjoy tinkering with thermostatic mixing valves, but it’s still advisable to seek professional help when it comes to setting up your mixing valves or just to ask what they can do for you. If you need to install thermostatic mixing valves, you may want to call in a professional plumber who can give you the best possible configuration for them.
That said, if you’re the hands-on type who can’t resist rolling up your sleeves, here’s what’s typically involved in installing a thermostatic mixing valve:
What You’ll Need:
- Thermostatic mixing valve
- Adjustment knob or switch (usually included)
- Adjustable wrench and pipe clamp wrench
- Teflon tape (plumber’s tape)
- Clean rag or towel for cleanup
- Suitable gaskets and, if needed, adapters for pipe size differences
Step-by-Step Installation:
- Turn Off the Water Supply: This is a must, as nobody wants a surprise shower mid-project. Double-check that nothing will spray when you disconnect the current fittings.
- Remove the Old Valve: Use a wrench to carefully loosen and remove the existing valve. Keep a towel handy to mop up any lingering drips.
- Check Pipe and Valve Sizes: Measure the pipe diameter and compare it with your new valve to ensure a snug fit. If the sizes don’t match, use adapters (available at local hardware stores).
- Prepare Connections: Wrap several turns of Teflon tape around the valve threads to help create a watertight seal and keep leaks at bay.
- Clean the Connection Points: Wipe down the area with a cloth to remove any debris. Gunk and grit can compromise the connection.
- Fit Gaskets and Connect: Place the right-sized gaskets or O-rings into their grooves. Attach the valve to the pipes and tighten everything with a clamp wrench. Make sure the direction of flow is correct.
- Install Knob and Cover: Attach the adjustment knob (which lets you set your ideal temperature) and the cover to keep the inner workings protected.
- Test for Leaks: Slowly turn the water supply back on. Watch the valve connections closely for weeping joints. If all seems well, test the temperature at your outlet to confirm everything’s running smoothly.
Extra Tips for a Smooth Installation
- Always Follow Manufacturer Instructions: Every thermostatic mixing valve has its quirks. Check the product manual for any unique requirements, as manufacturers like Honeywell, Watts, and Grohe all have slightly different specs.
- Positioning Matters: Install the TMV in an accessible spot for easy maintenance. Ideally, keep it close to the outlet (shower, bath, or tap) to prevent the mixed water from cooling as it travels through the pipes.
- Check Your Water Pressure: Make sure your system’s water pressure matches the TMV’s operating range. If you’re dealing with high pressure, you might need to install a pressure-reducing valve.
- Flush the System First: Before hooking up the new valve, run water through the pipes to clear out any lurking debris or sediment. This step helps avoid blockages.
- Calibrate for Comfort and Safety: Once installed, use a thermometer to double-check the water temperature at the outlet.
Common Faults and Troubleshooting for Thermostatic Valves
Of course, even the most reliable thermostatic mixing valves aren’t immune to the occasional hiccup. Over time, you might run into a few pesky issues, but knowing what to watch for makes these problems much easier to tackle.
- Temperature fluctuations: If your showers or taps start serving up unexpectedly icy or scalding hot water, it could mean the valve has lost its calibration or that a component (like the thermostatic element) is starting to wear out.
- Leaking water: Dripping or pooling around the valve often hints at worn-out internal seals or O-rings, which is nothing a routine replacement can’t fix.
- Reduced water flow: If you notice your water pressure taking a nosedive, mineral build-up or debris caught inside the valve could be to blame. This is a common issue in areas with hard water.
- Valve won’t fully shut off: Sometimes, a TMV might fail to close completely, leading to continuous drips or unwanted mixing of hot and cold water.
The good news? Many of these issues can be nipped in the bud with regular servicing. If any of these symptoms crop up, it’s usually time to schedule a checkup with a professional.
Keeping Your TMV Happy: Maintenance Tips
A little preventive care goes a long way. Here’s how to keep your thermostatic mixing valve in tip-top shape:
- Periodic inspection: Give your TMV a once-over every so often. Look for leaks, corrosion, or any signs of wear and tear.
- Cleaning and descaling: If you’re in a hard water area, mineral build-up is a sneaky culprit behind sluggish valves. Regular cleaning and descaling help keep things flowing as they should.
- Double-check temperature accuracy: Every now and then, test that your TMV is delivering water at the right temperature.
- Replace worn parts: O-rings and seals are the unsung heroes keeping leaks at bay, but they don’t last forever. Swap them out with manufacturer-approved parts when they start to show their age.
- Troubleshoot like a pro: For mysteries like fluctuating water temp or reduced flow, start with the basics: clean the valve, check for blockages, and make sure your system’s water pressure is balanced.
When in Doubt, Call a Pro
While it’s tempting to take on the challenge yourself, bear in mind that an incorrectly installed valve can lead to serious leaks or water damage. If reading this has your head spinning like a plumber’s wrench, don’t worry. There is no shame in calling a certified plumber to handle the job. A proper installation helps avoid headaches like stubborn leaks and surprise waterworks, so don’t hesitate to ring up a local expert if you’re unsure.